Let’s imagine that I’m the successful owner of a popular aquarium blog. Here is how I might go through the steps to prioritize work for it.
In this project, my goal is to accumulate as many new readers as possible.
After free-flowing for half an hour, I came up with a list of article ideas. I also have some in there that came into my mind throughout the day.

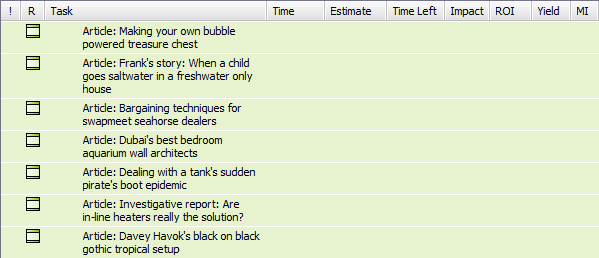
Figure 1. At this stage they are sorted in the order that I created them.
I sketch out the tasks that I would need to do to complete an article.

Figure 2. Child tasks under a folder.
Since their order is strict, I drag and drop them into the order that I want.

Figure 3. Dragging and dropping to manually set the order by filling in the MI, or Manual Index, column.
Which gives me something like this:

Figure 4. Child tasks arranged in a strict order after dragging and dropping.
Notice that dragging and dropping the order set the MI, or Manual Index, to hold the order that I wanted. If I wanted to remove the manual order, I could select the tasks and set the MI column to 0.
Since the articles each have the same child tasks I can copy and paste them from one folder into another. To do this I select the tasks that I want to copy and hit Ctrl + C. Then I select where I want to paste them. If I select a folder, they will go into that folder with their MIs stripped, if they had any. If I select a task with an MI, then the paste operation will set new MIs so that they follow the selected task and hold that order.
I select another folder representing a new article and paste them there.

Figure 5. After pasting the child tasks from the shell psychology article onto a folder for another article.
Since I pasted onto a folder, they are created without MIs. However, a paste operation creates tasks in the order that the source tasks were sorted. Since it will sort in the order that they were created if there is nothing else to go on, they come out looking the same. To ensure that they stay in this order even after I set estimates or impacts, I hit the Manual Order button to toggle the manual indexes.
Figure 6. The Manual Order button will set the manual indexes to ensure the current order is preserved. If the selected task already has an MI, then hitting this button will remove it.

Figure 7. Our child tasks with set MIs after clicking the Manual Order button.
The criteria with this project is how many readers I think a task will get me. I'm tempted to stop there, but there are criteria towards making an article that will get me many new readers. I can break it down further into the following directions that I feel my readers are looking for:
1. How does this expand and challenge the readers' notions of what is possible in their aquarium lifestyle?
2. How does this information move the readers towards more functional aquariums?
3. How does this lead and inspire readers?
Running through my list and weighing them against the criteria I just came up with, I come up with the amount of readers I think each article will bring. Since the direction has a direct mapping to a number, in this case number of readers, I can directly set that number as the impact here.
Because putting in estimates will change the order, I uncheck the “Keep Sorted” check box so that I can work down the list without them moving around on me.
Figure 8. Unchecking the "Keep Sorted" button is helpful when making many changes to impacts or estimates that can change the order.
After setting the impacts, I click the sort button to see what my lists looks like. Here are my top 3 articles in terms of impact:

Figure 9. After filling in impacts, they are sorted by that order since all the estimates at this point are not set.
Almost there, now that I have my estimates thought about, I go through the articles and ballpark how long I think they will take me. When I finish, I can refine the estimates for the top tasks since these are the ones I will be working on.
Again, it is important that I keep the impacts and estimates seperate in my thinking, so that if either of these values changes on their own, the ROI prioritization can make the best decision for the order in which you should do them.
After filling in the estimates, immediately the Time Left, ROI, and Yield columns are filled in.

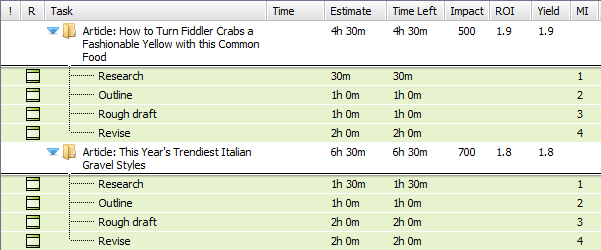
Figure 10. Finished, with impacts and estimates ROI prioritization kicks in.
Notice that after we set our estimates in figure 10 that the Fiddler Crab article, with an impact of 500, is now above the Italian Gravel article, with an impact of 700. What gives? If the Italian Gravel is estimated to get 200 more readers, why isn't it first? ROI prioritization takes into account the estimate and the impact, to calculate the ROI and the yield. The ROI is the per minute impact that you estimated to deliver if you were to begin the task from the start. The yield is the same thing, only not from the start but from where you currently are in terms of progress.
If you haven't started on it yet, then the ROI and the yield are the same, but as you work on it, the yield goes up.
ROI prioritization sorts based on the yield of each task. So, the reason the Fiddler Crab article is higher is that the expected yield is higher. The Fiddler Crab article has a lower estimated impact, but it also estimated to take less time to complete, so you are getting more readers per minute by working on that article. Since the metric we use for the impact column is the estimated amount of new readers, and the ROI is 1.9, we are estimated to be getting 1.9 new readers for every minute of effort spent on the Fiddler Crab article.
So there you are, working happily on the Fiddler article, confident in that it is the best use of your time right now. As you work on it the yield for that task increases. This is because as you work on something, it becomes more valuable to continue working on it, because you are closer to finishing. ROI prioritization assumes that the impact only applies once the task is finished.
Let’s say that you are 2 hours into the Fiddler Crab article and one of your coworkers comes in your office, panting. In fragments, he explains: they just got a sample of the latest avant-garde gravel from Rome. You take one look and you know this is going to cause a stir, you can see that this going to be is like Stravinsky's Rite of Spring for the aquarium scene. This isn’t going to be a +700 reader article, this is a +1000 article.
Now what should you do? Should you drop work on the Fiddler Crab article? Or should you continue anyways? We can enter our new assumptions into our project by setting the Gravel article's impact to 1000.

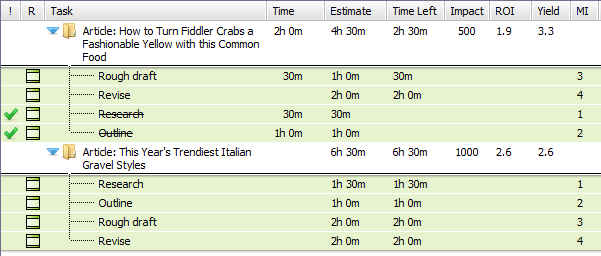
Figure 11. After 2 hours of effort and updating the Gravel article's impact.
Looking at the new information, we see that if we were starting over, we would start with the Gravel article, it has a 2.6 ROI compared to a 1.9 ROI. However, since we have 2 hours already invested and the estimates haven’t changed, you now can think of the Fiddler Crab article as a +500 article that only requires 2h 30m of effort. This would be a 3.3 ROI from this point on. This is exactly what the yield column is for, it tells you “based on what has happened from this moment onwards working on this task to completion will average X impact points per minute.” It is as if the work you did on it previously just appeared, because that work has already been invested, you can’t go back on it. So it doesn’t make sense to include it.